bookbinding project
At last we come to bookbinding, and what a challenge this week has been!
This was probably the most difficult stage of the course, as bookbinding's evolution encompassed a wide variety of techniques for joining quires and boards.
bookbinding inspiration
Here are some of the examples of bookbinding I looked at before diving into the whirlpool of binding my own little codex :)
Mathematarion in Byzantine music notation - a remarkable example of bindings in the Byzantine style in the British Library with link stitches and headband sewing.
CBL W 139 - a Byzantine manuscript - interesting description of the conservation of this 11th - 12th century manuscript, with images of endband and fabric mesh and textile covers.
Salzburg Sermons - a 15th century manuscript in German and Latin, with wonderful binding of chiselled leather - cuir-ciselé - the pattern being of vines/leaves
Book of Hours W.168 - this 15th century Latin manuscript has clasps for fastenings - the same purpose as my buttons below, but probably sturdier!
Useful hints/tutorials:
Very helpful: the Fitzwilliam Museum's info about herringbone stitch - a short, precise explanation, wonderful - I would never have managed it otherwise!
Nice pic: Ligaturae - Coptic Bindings - and a clear, simple pic of working link stitch, which also seems to be called chain stitch or coptic stitch.
Endband/Headband Hero: Sherif Afifi - Byzantine Binding Tutorial Part 3 - the endband beautifully worked, could see what I was aiming for.
Binding the codex
I decided to do two "test" versions for binding to see which method I would prefer to use for my codex - either Carolingian or Byzantine binding.
carolingian bookbinding
Two pieces of card for boards, each folded in half as I need a fold for the thread to come out right at the edge of the board as I am not using a thick piece of wood with drilled holes :)
Holes measured for ropes and thread, sequence of sewing through ropes prepared.
There will be five sewing stations - two for the sewing thread (one at each end) and the centre three stations for the ropes:

Now we have ropes threaded through holes and coming out of edge folds of upper board:

The upper board is turned over and the first quire is placed on top.
Thread sewn through to first hole with rope - double support with herringbone:

Text block now sewn onto upper board, link stitching at first and fifth stations:

Text block sewn onto lower board, sewing in reverse order to attach:

Without a frame, this was a very fiddly task, particularly with thin card!
byzantine bookbinding
Front and back "boards" prepared with stitching down each of the inner edges.
I've kept the same measurements as before for the sewing stations, so there will be five stations.
The text block will be sewn with link stitch, and then link-stitched to the stitching along the edge of the boards:

Sewing the first quire to the stringed board:

Text block now sewn to the board with link stitches:

Back board will now be sewn onto the text block with link stitching:

Here is the finished test codex!

Sewing the "real thing"
Now it's time to bind my codex for real :)
I'm going to follow the Byzantine method.
First I prepared the boards - measuring and sewing the stations:

Here is the codex with text block and boards now sewn together with link stitch:

Then I glued some fine mesh fabric to reinforce the spine, the fabric extending towards the outer edge of the boards:

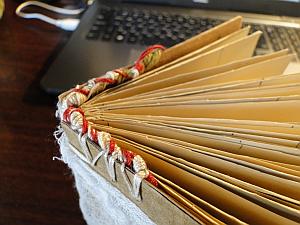
The endband at the top of the spine was, indeed, the most difficult part of the process, but after a few disastrous practice sessions on my test quires, I thought I could just about do it!
I figured out that for my codex, the easiest way was:
- sew the linking thread for the rope support
- thread the rope (green yarn) through the linking threads so that it lies along the top of the boards
- sew over the rope with two different colours to jazz things up a bit.
And here we are:


Phew! Next step: the cover.
I folded a piece of grey card and glued just the corners together that wouldn't be touching the codex:

Then, with great difficulty because of the glued corners (!!!) I fitted the codex into the cover:

For the fastening, I decided to sew a button on the front, another on the back, and use a piece of crocheted chain that winds round the buttons to keep the codex shut:

The very last step was to add a little decoration. It would have been nice to try some chiselled leather with tree shapes, as this would match the content of the book.
Instead, I sewed a tree onto a piece of card and glued it onto the front of the codex:

And so we finish our marvellous course where we began - with a pot of coffee :)
Thanks for reading! What shall we study next?
